How can I reactivate deleted learning units?
Deleted learning units can be restored under the “Deleted” tab on the respective learning unit overview page (the ID remains the same).
Note: If a learning unit has been deleted “permanently,” it cannot be restored.
What are the dashboards in nectar LMS?
nectar LMS has three different dashboards:
- Learner Dashboard
- Instructor Dashboard
- My Team Dashboard (for supervisors)
The Learner Dashboard provides an overview of seminars, deadlines, active learning units, gamification points, and much more. Each learner dashboard is customized for the respective user and can also be used as a start page. For more information, see Dashboard coming soon!.
The instructor dashboard is available from version 5.0 onwards. Here, instructors can see their seminar dates. For more information, see Instructors. The dashboard can be activated in the group settings.
The My Team Dashboard gives supervisors an overview of their employees. It displays key information on progress and mandatory units and provides access to the statistics area – limited to the supervisor’s own team. This dashboard can also be activated in the group settings. For more information, see Supervisor. coming soon!
What are the three types of points in nectar LMS?
Points = Under Administration > Settings > Configuration > Gamification, you can set the points per action. These are visible next to the user’s profile picture if gamification is enabled in your LMS. Link to gamification coming soon!
Education points = These points are based on the time spent learning within a learning unit. Detailed information about education points can be found here. coming soon!
What meanings does the trash can symbol have?
a. Deleting a learning unit from the LMS. Under Administration > Content > Content Type in the overview table in the “Action” column. This removes a learning unit from the LMS. Learning units can be partially restored.
Note 1: For courses, each individual version must be deleted.
Note 2: Course series can only be deleted if there is only one version.
b. Learning units (user profile): This deletes the individual assignment (even if the user has already completed it).
c. Learning history (user profile): This deletes the learning progress.
Note 3: The entry is only retained for users with “completed” status.
d. Statistics: This deletes the learning progress.
A learner has completed a course. Why is it not marked as completed?
When a course has a required feedback form, the user must complete the feedback in order for the course to be complete. This is not related to the completion of the contents of the course itself.
You can see the status of a user’s feedback either under Users > User Profile > Learning Units and/or Learning History or in the Feedback statistics (Users > Statistics > Learning Status Detail > Feedback Statistics)
To check if a course has a feedback form, go to Administration > Content > Courses > Edit Course > Settings. There, you can see if the course has a feedback form and whether the feedback is optional. If there is no “Optional” checkbox, or if it is not selected, the feedback is automatically a required feedback form.
How do I search for expired course completions?
With the new option “Include historical learning progress” in all statistics under Administration > Users > Statistics > Learning Status Details, learning units with expired completions are also displayed in the results.
Alternatively, you can view all of a user’s learning units in the user profile under Learning History.
I have created a new version of the course. Why do some users still see the old one?
Users see the version of a course that has been assigned to them. Users who have not yet opened the course are automatically updated to the latest version and only see this version.
However, users with the course status “In progress,” “Completed,” “Passed,” or “Failed” will not see the new version. To bring these users up to date with the course, their progress must be reset.
I want to make a cross-client course. Why can't I update this setting?
This setting cannot be changed after the course has been created. If a course was not created cross-client, it cannot be made cross-client with a new version. The course must be created again so that the desired setting is taken into account from the start.
My E-Learning course won't load. What could be the cause?
If the course opens but the content does not load, this may be related to your browser settings. In Firefox, for example, media settings are often disabled by default.
The following video shows how to enable these settings: Download the Video tutorial
My E-learning course won't start. What could be the cause?
When a course opens but the content doesn’t load, it could be related to the browser settings. Some browers deactivate the “autoplay” feature automatically. When this setting is reactivated, the content should load normally.
This setting can be found here in the following browsers:
- Firefox: Data Privacy and Security
- Microsoft Edge: Cookies and Website Permissions
- Chrome: There is no setting available
What is the difference between Limit Access, Validity Period, and Mandatory Unit?
If you click Restrict access, you can determine how many days a piece of content is available to learners and whether the learning unit must be booked before learners can complete it.
The type of validity period determines when the validity of the completion of the learning unit expires.
If the mandatory unit function is activated, learners receive a notification as soon as the interactive content is available to them and by when it must be completed.
Further information can be found under the general settings coming soon!
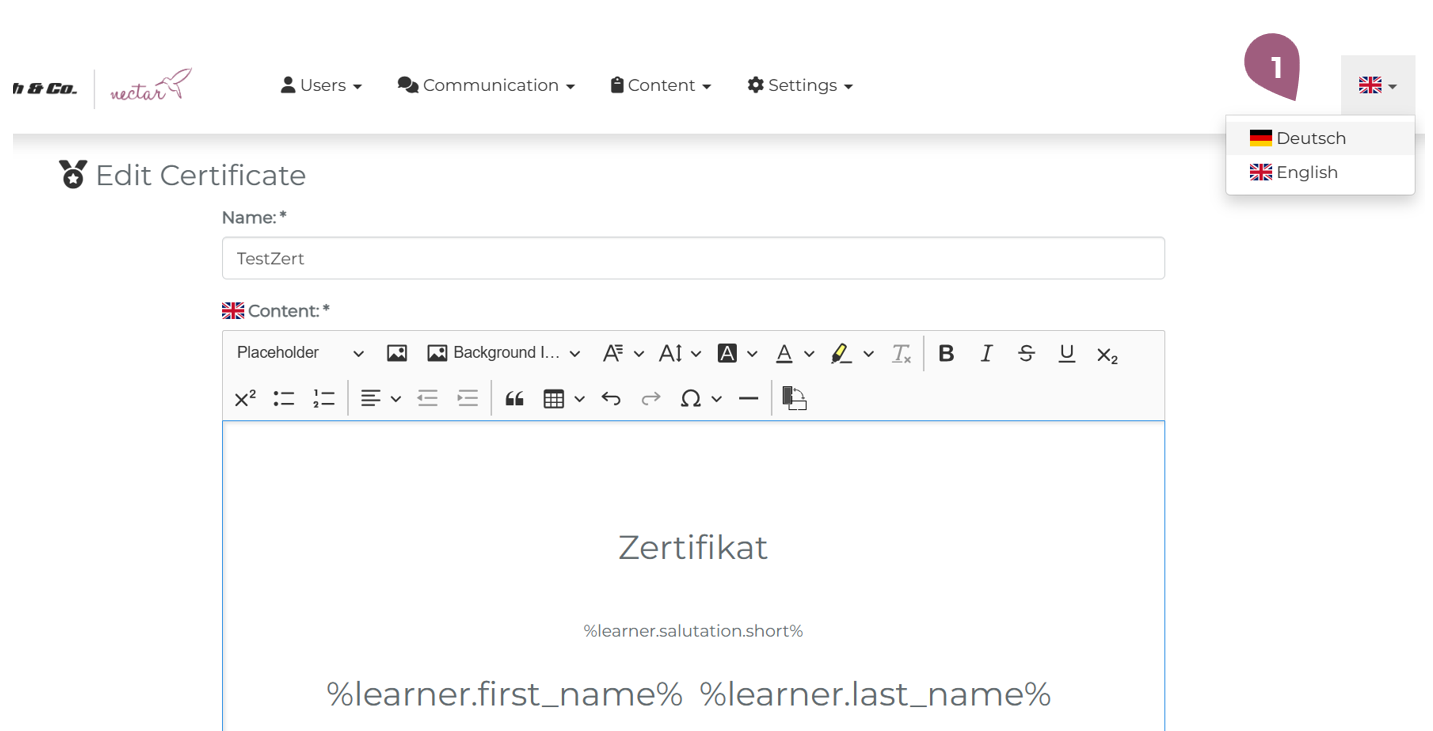
I want to send a certificate in multiple languages. How do I do that?
One certificate can be added multilingually so that it adapts to the system language of the learner. In order to this, you will need to save the same certificate in both system languages.
The steps to do this are as follows:
- After inputting the certificate in one language (here English), save the certificate.
- Re-open the certificate to edit it. While editing the certificate, change the system language (1) (here to German).
- Input and save the german version of the certificate.
The certificate must be saved two times, once under each system language (German and English), in order for the certificate to be saved in both languages.
Then, the certificate will be sent to the learner in the system language of the learner.
Where can I find users' expired certificates?
Expired certificates are available under Administration > Users > Users in the respective user profile in the learning history, provided that the “LMS certificates visible even after expiration” function is activated under Administration > Settings > Configuration.
Curriculum: The learning progress was reset. Why was the progress of all elements within the curriculum also reset?
Because a curriculum is defined by the learning elements it contains, the progess of each individual learning element will be reset when the progess of the curriculum as a whole is reset.
I have created a new version of a curriculum and assigned it to the corresponding groups. Why can't the users acess the updated version?
In order for both administrators and users to have access to the newest version of a curriculum, the learning progress of the curriculum must be reset. There are two ways to reset the learning progress:
- Reset the learning progress of an individual user. In the learning history of the user, an administrator can reset the progress of the curriculum. (Administration > User > Edit > Learning History)
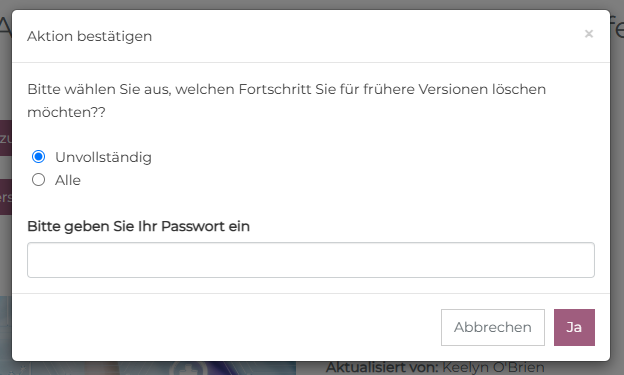
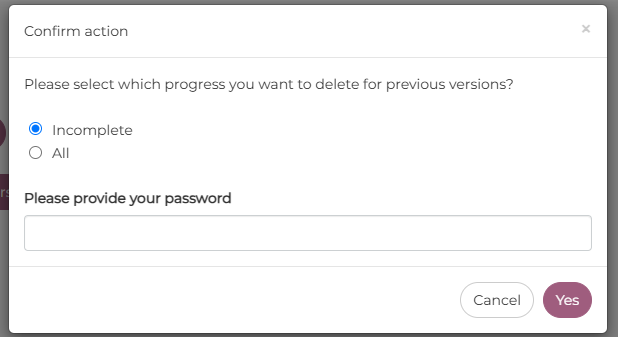
- Reset the progress of all users with access to the curriculum. The administrator can choose to reset the progress only for those with incomplete curriculum. This can be completed from the curriculum itself (Content > Curriculum > Reset Progress). The following popup will appear:
What do I need to take into consideration when changing a learning sequence from a curriculum to a lernbox?
In order to prevent users from being unenrolled in their seminar(s), they should never lose access to the seminars. Therefore, the following steps are of utmost importance:
After the lernbox has been created and the corresponding seminar(s) have been added, the lernbox must be added to the corresponding group(s). In this way, the users have temporary access to the seminar through two (or more) different paths – through both the lernbox and the curriculum.
Only then can the curriculum be removed from the participant group(s). Because the users never lost access to the seminar(s), they will not receive an automatically generated email notifying them of the seminar’s “cancellation.”
It is important to take care that the learners have access to all seminars in the one or more affected curriculums before the curriculum is removed from the participant group(s). Otherwise, the users will receive an automatically generated cancellation email.
Why can't I add a seminar or course with limited access as a learning element to a curriculum?
Access to an individual learning element can be limited only when the entire curriculum is limited. As soon as a user has access to the curriculum, they should have access to all of the included learning elements. Therefore, it is impossible to add individual elements that are currently access-limited.
A learning element cannot be assigned to any groups. What could be the cause?
Before a learning unit (course, document, etc) can be assigned to a group, the learning unit must contain content (SCORM, courses, seminars, etc.,) and be published.
In more detail:
- Courses, media, or presentations must contain their corresponding content
- Curricula/Lernboxes must contain at least one item (course, seminar, document, etc.)
- Seminars must contain at least one meeting
- Tests must include at least one question
Items that can have different versions (currently courses and curricula) must also publish the latest version of the item using the “Publish Version” button. Only then will the updated version be listed in the assignment table in Groups.
How should I set up my group structure?
The group structure can be flexibly adapted to the needs of your organization. For example, users can be organized according to target groups, subject areas, departments, or a combination of these.
Since users can belong to multiple groups at the same time, the group structure can be used in a versatile and purpose-oriented manner.
I want to change the structure of my groups. What do I need to know?
Group Hierarchy
At this time, groups cannot be raised or lowered in the hierarachy. In order to raise the level of a group, a new group must be made and the assigned materials, seminars, participants, etc. must be added. Otherwise, the users can lose access to mandatory elements, receive automatic emails notifying them of a seminars “cancellation,”and/or lose existing progress on courses.
Changing Group Structure
When you want to change the group structure and ensure that the learners do not lose their learning progress or are sent any additional messages, it is important to first create the new group structure and then add the learners as well as the corresponding learning contents. Only then, when the new group mirrors the old, can the learners be removed from the old group and the group can be deleted.
Seminars and Required Learning Elements
This temporary overlap of the old and new group structure is especially relevant for seminars and required learning elements. As soon as a learner loses access to a seminar (either the seminar is removed or the learner is removed from the group that has access to the seminar), the learner will be automatically unenrolled. They will also receive an email notifying them of unenrollment. The proccess is similar for required learning elements. When the learner or the required learning element is removed from a group, the learner will lose access to the required element. They would then receive a new message to complete the training upon being assigned to the new group.
What happens if I remove a learning unit that contains a skill from a group?
When a seminar that includes a skill is removed from a group that it was previously assigned to, the skill:
- remains in the statistics and users retain this skill and
- is visible in both the statistics and the user profile.
Why are my groups not structured correctly after the CSV import?
The group structure of manually created groups can only be updated manually. The user properties of users in the group can still be updated via CSV import.
For manually created groups with assignment conditions, changes may occur after a CSV import if the corresponding user properties are updated. Users are only automatically removed from a group if the “Automatic removal” setting is enabled in the user properties.
Detailed information on updating users via CSV import can be found here. coming soon!
Why can't I add a user to a group?
If the affected user(s) do not appear in the “Add User” list, it could be that the user(s) are marked as “inactive.” In the “Users” tab, review if there is an arrow symbol next to the user(s) name (1), which indicates an inactive user. An example has been shown below:
The user can be reactivated by clicking on the arrow (1). Once the user has been reactivated, they are again able to be added to a group.
Why do users lose access to a group?
A learner’s group assignment is based upon many different attributes that when changed can impact their automatic group assignment. Therefore, it is important that the learners have limited access to their account’s properties. If an attribute is edited or adapted by the learner, they can lose access to the corresponding group(s).
As a Superadministrator, you can determine which attributes a learner is allowed to edit. This can be accessed under Super Administrator > Settings > User Properties.
As an administrator, what do I need to take into consideration with linked meetings?
When a meeting is linked with other meetings and you want to manually add learners to the meeting, you must add the user to each individual meeting. The combinated registration works only when the user registers themselves for the meeting.
I am an instructor. Why can't I see my seminars on the course overview page?
With the 5.0 update, instructors now have their own dashboard. It displays all seminars in which you are involved as an instructor. The course overview page only shows seminars that are assigned to you in your role as a learner.
How do I remove a language from a seminar?
In order to remove a language from a seminar, it cannot be assigned to any participant groups. After you have removed the assigned groups from the seminar, it will again be possible to remove the language.
The seminar has been closed and the learner participation has been confirmed. Why can't I send the certificate to the learners?
The certificates are only made available when the meeting has been manually finalized. To finalize a meeting, navigate to the “Current Users” tab (1) in the Participants section of the meeting (Seminar > Edit > Manage Meetings > Participants). Clicking the Finalize (2) button will permanently close the meeting. This step cannot be undone.
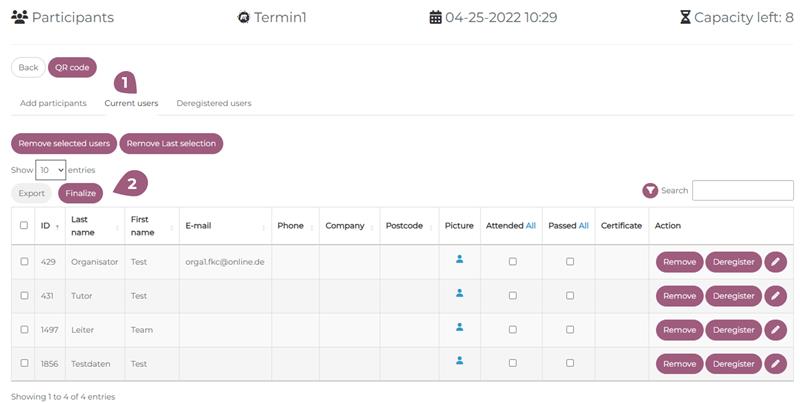
After the meeting has been finalized, the button “send” appears next to “Certificate.” This will send the certificates out to all participants.
There are no reasons for canceling/unregistering from an appointment in the LMS. How can I add reasons for this?
You can create new reasons under Administration > Super Administrator Settings > Reasons of meeting deregistration. These are visible across all clients.
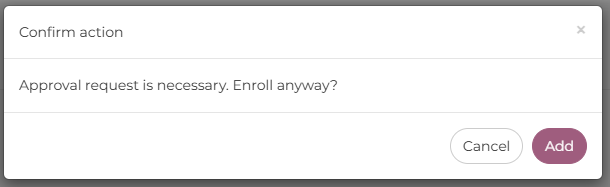
When a user is manually added to a seminar that requires approval for registration, does an administrator need to manually register the user as well?
No. If a learner is manually added to a seminar, the “approval” step is overridden.
The administrator does not need to take any further action for the learner to be fully registered.
When attempting this action, the administrator will be prompted with this popup:
When I want to remove a seminar, or a Lernbox/Curriculum containing a seminar, from a participant group, what do I need to consider?
When a seminar, or the Lernbox/Curriculum containing it, is removed from a participant group, all participants (both those registered and on the waiting list) will be deregistered unless they have access to the seminar through another group.
Participants without access to the seminar through other groups will be unable to see the seminar.
When attempting this action, administrators will be prompted with the following popup message:

When is a seminar completed?
A seminar is considered completed when:
- at least one session or combined session has been registered as attended/passed by the learner, and
- the session or combined session is in the past, and
- the session is marked as completed by the instructor or administrator.
Further information can be found in participant management, under “Completing a Session (coming soon!).”
What is the difference between removing a user from a meeting and deregistering them from a meeting?
Remove from meeting
This function is intended for internal meeting management. Therefore, only users with the roles of organizer, tutor, or (super) administrator may remove participants from a meeting .
Removed users reappear in the “Add users” list. In the statistics, they are listed under “Not started” and are therefore not automatically displayed (the “Not started” filter option must be activated for this). The status “Removed by organizer” is displayed in the learning unit/learning history.
If a meeting requires approval, booking, or has a waiting list, the user must go through the respective process again (e.g., request approval again, purchase the booking again, or put themselves back on the waiting list—without claiming the previously reserved spot).
Deregistration from meetings
Deregistration is the general procedure when a user can no longer attend a meeting. This requires specifying a reason for canceling the session, which must have been created in the super administrator settings beforehand. Without such a reason, neither users nor administrators can perform a deregistration.
Users can deregister themselves using the “Unenroll” button. Supervisors (via the My Team dashboard), organizers (via the participant list), tutors, and (super)administrators (via the admin area) can also deregister users.
Deregistered users appear in the statistics as “Deregistered.”
In the user profile, the status in the learning unit/learning history is displayed as follows:
- “Deregistered” if the user has deregistered themselves.
- “Deregistered by organizer” if the user has been deregistered by another role.
More information on participant management can be found here coming soon!.
Why can't I register for a seminar?
If you are already registered as the Dozent/Instructor for a seminar, it is impossible to register seperately. As an instructor, you are automatically enrolled.
Why do the participants disappear when I copy a seminar?
When a seminar copied, participants are not automatically transferred to the new meeting. The participants must be assigned seperately.
Information on how to manage participants can be found under Participant Management (link coming soon!).
Why does a meeting display as "Full Capacity" when there are still open spots available?
It could be that the seminar and/or the meeting has an approval process. If so, the participant list would only display the participants that have already been granted approval.
Open approval requests may be the source of the message. Open requests for approval are treated by the system as temporarily reserved seats. In this case, the participant list will reflect only the participants that are both approved and enrolled. This is to ensure that no other users register or are registered while others are waiting.
Open approval requests can be found under Statistics (Administration > User > Statistics > Access Requests). From there, requests can be confirmed, denied, or reset.
How can I change the entry point for learners on the home page?
It is possible to change the entry point for learners on the home page from courses to another learning element. The settings can be found in Administration > Settings > Configuration > Settings > Entry Point.
If you would like the learners to begin with a topic, this option must first be enabled in the group settings. This can be actived in Administration > Users > Groups > Settings > Topics. Once this option is activated, you should be able to choose Topics in the Entry Point drop-down menu.
How do I change the background image on the home page?
A custom photo, video, and/or welcome text can be placed on the home site. The background image can also fade in/out as desired. In order to change this setting, go to Administration > Users > Groups > Settings.
Note that this changes the background image settings only for the selected group.
More information on changing the graphic settings be found at Startsite Graphics (link coming soon!)
What are the optimal dimensions for the group homepage graphic?
Optimal dimensions for the homepage graphic: Width: 2074 px; Height: 914 px (if the total height is to be used)
What are the optimal dimensions for the preview image?
The preview image is set when the respective learning element (e.g., course, seminar, or video) is created.
Optimal dimensions of the preview image: Width: 650 px; Height: 390 px
Why can't I see a menu category?
If you have been assigned a menu category but it is not visible, you may be in the wrong group view.
Since menu categories are group-specific, you must switch to the appropriate group to which the menu category has been assigned. It will then appear in the main menu.
An administrator has created a new message for their client. Why are users in all clients receiving this message?
Messages are created across all clients. Once a message has been created in one client, it is available in all clients. However, changes to the message are client-specific.
Why can't I select the event for a system message?
There are two types of system messages in nectar LMS:
- System-generated system messages
- User-defined system messages
System-generated system messages are sent automatically as soon as a specific event occurs. These messages can be customized or replaced, but the underlying event is fixed and can only be viewed.
With user-defined system messages, the event can be freely selected. These can be identified by the trash can icon—with the exception of the “Appointment starts” message for seminar appointments. Although this also has the trash can icon, it is a system-generated message whose event cannot be selected.
Why does it say "yes" in the "attachments" column when there is nothing attached?
Some messages are intended to be sent out when an attachment is generated (i.e. a certificate being sent out after the completion of a course). In this case, the system settings read that there is an attachment, not because one is attached to the message itself, but because the action that triggers this message to be sent out (completing a course) also generates an attachment (a certificate).
The attachment itself is not necessarily stored with the message, so it is not able to be seen or edited from the system messages page.
A user has a new email address. I would like to update the username to match the new email address, while making sure that no learning data is lost. How do I do this?
You can select the user name under Administration > Users > Users > Edit user and change the corresponding user data, provided that this user name does not already exist in the LMS.
Users may only edit their user name in the LMS if the field is editable. Under Administration > Super Administrator Settings > User Properties, you can decide which user properties can be edited by learners.
How do I delete users that have access to multiple clients?
Learners must be removed from every individual client. When you click on the trash can next to learner, they are not marked as “inactive” for all clients. Instead, they have been removed from only that individual client. The user keeps the “active” status for all other clients. The user must be removed from each client seperately.
Only when a learner is registered under only one client will they be marked as “inactive” after clicking on the trash can. This means that when you want to remove a learner that has access to multiple clients, the learner will be “inactive” only for the last client (i.e. the last one they were removed from).
I am a new user. I reset my password. Why can't I log in?
Please pay attention to your password and username. The username entered must match your username 100%.
I have accidentally clicked "Delete users that are not listed" while uploading a CSV file. Now, many users are set to inactive. How can I reactivate them?
You can manually activate these inactive users in the user overview or import a new CSV file including these users. Upon reactivation, they will be automatically reassigned to the respective groups.
Is there a maximum size for uploading profile pictures?
Yes, the maximum file size is 5 MB. This limit can be increased by the nectar team if required.
What information does a supervisor receive about their reportees?
In nectar LMS up to two supervisors can be added to each user’s profile. Supervisors have in principle the same rights as a learner. They do have the ability, however, to access one additional feature – the Supervisor Dashboard. The dashboard can be activated from the settings in Groups (Administration > Groups > Settings (at the right end) > Supervisor Dashboard). The dashboard can be accessed under “My Team” from the main menu.
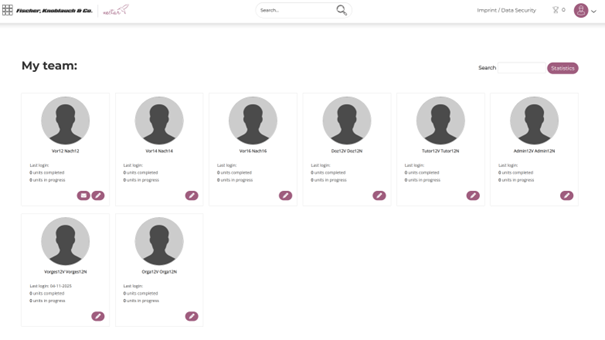
Supervisors can see key information about their reportees accounts. On the dashboard, they can see the learning history of the users and follow up with how many of the assigned learning elements are in progress or completed.
Through the dashboard, supervisors also have access to statistical reports that include only the users assigned to them.
Why do "old" users still appear in my reports?
When you export a report under Administration > Users > Users or Administration > Users > Statistics, it will automatically display all users of this client, as the “User Status” filter is set to active and inactive. If you only want to include active users in the report, you must set the “User Status” filter to active.
Why were some user properties not updated via CSV import?
The dropdown properties in the CSV file must match exactly with an option from the dropdown field. If the entry for a dropdown property does not match an existing option, the update will not be performed correctly. In this case, the LMS automatically selects the first option from the list. If this first option is empty, the user property also remains empty.
Entries in dropdown properties that are not in the options will not be updated correctly. Empty options can also be included in the list. If the first option is empty, the user property will also be empty. Numbers and characters such as spaces or quotation marks can disrupt the CSV file. These are often difficult to detect, but can still have a large impact on the upload. Check your CSV file carefully with a text editor if you suspect that errors are occurring during upload.
Note: Pay special attention to correct spelling in the username when importing CSV files because the username (unless otherwise specifed) serves as the key between the CSV file and the LMS.