Update users via CSV import
Important points to consider when importing CSV files are as follows:
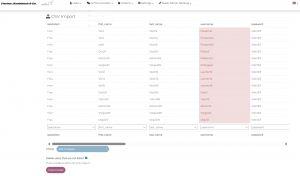
The username serves as a “key” between the CSV file and the LMS.
a. The LMS recognizes users by their usernames. If the usernames are recognized by the LMS, they are marked in red in the CSV import table. The users marked in red are updated with this upload. The users’ learning units are not affected by this.
b. If the username differs by even one letter or digit, or if an incorrect username is entered, a new user is created and the existing user is not updated. If the “Remove unlisted users” option is selected, users not included in the CSV file are set to inactive.
c. If there is an error in the CSV file, the LMS may not be able to read the line. In this case, the line is interpreted as empty and the user is not updated.
d. If you want to change the user name, please refer to the following article: Edit user profile (coming soon).
Active and inactive users
a. Only users included in the CSV file will be updated. Other active users will remain unchanged.
b. Users who have been set to inactive in the LMS will be reactivated and updated if they are included in the CSV file.
c. If you want to set users to inactive, you must check the box “Remove unlisted users.” All users not included in the CSV file will then be set to inactive.
d. Manually created users cannot be set to inactive via CSV import.
Users cannot be permanently deleted from the LMS via CSV import. Permanent deletion is only possible manually in the respective user profile.
Manually created users
a. Although manually created users cannot be set to inactive via CSV import, it is still possible to update them.
b. As long as the username in the LMS is identical to the username in the CSV file, the user will be updated accordingly.
User properties
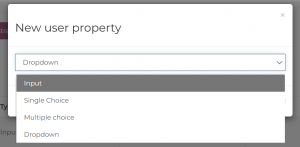
a. The user properties you have created can also be updated via CSV import. Pay particular attention to properties that have been defined as input or dropdown fields.
i. Input properties are overwritten during import.
ii. Dropdown properties are sensitive because only predefined options are allowed. The entry in the CSV file must match exactly with an option from the dropdown field: Input, Single Choice, Multiple Choice or Dorpdown (see screenshot).
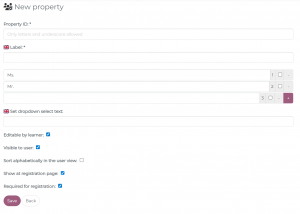
b. If the entry for a drop-down property does not match an existing option, the update will not be performed correctly. In this case, the LMS automatically selects the first option from the list. If this first option is empty, the user property will also remain empty.
c. Entries for drop-down properties that are not in the options of the user property will not be updated correctly. Empty options can also be included in the list (see screenshot). If the first option is empty, the user property will also be empty. Numbers and characters such as spaces or quotation marks can interrupt the CSV file. These are often difficult to detect, but can still have a major impact on the upload. Please check your CSV file carefully with a text editor if you suspect that errors are occurring during the upload.
Group (manually created group with and without assignment conditions and CSV-created group)
Group membership can be updated via CSV import, but the following points should be taken into account:
- Groups created via CSV import: Groups created via CSV import can still be changed via another CSV import. Users can be added or removed.
Even if the name of a manually created group is identical to one created via CSV import, no users will be added to the manually created group. Instead, a new group will be created after the CSV file is uploaded, and the users will be assigned to this new group.
- Manually created group with assignment conditions: These groups are not updated directly by the CSV import. Only the corresponding user properties are updated. Since the user properties are updated, it may happen that they no longer meet the assignment conditions. In this case, the user is automatically removed from the group, which updates the group.
Users will only be automatically removed from the group if the “Automatic Removal” setting is enabled in the user properties.
- Manually created group without assignment conditions: The group structure of this group can only be updated manually. However, the user properties of the users in the group can still be updated via CSV import.
“Gruppe” vs. “groups”
On the CSV file import page, you will see two “Group” options:
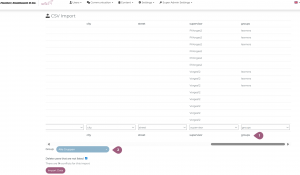
The first is a column that corresponds to a column in the CSV file (1). This column creates groups in the LMS and assigns users to these groups. These are the groups created by CSV import mentioned above.
The second drop-down menu “Group,” which is displayed below the CSV table, determines which group newly created users are imported into (2). This only applies to the first import. By default, all users are imported into the “All Groups” group. However, users can also be imported into subordinate groups. If “Delete users that are not listed” is clicked and a subordinate group is selected, all active users in the LMS who are not included in the CSV file are set to “inactive” – not just those included in the selected subordinate group.
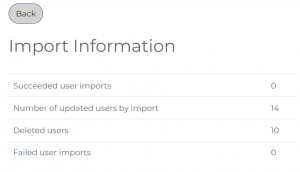
Messages after import
After import, four messages are displayed:
- User imports achieved: Number of newly created users.
- Users updated by import: Number of users already existing in the LMS who were updated by this import. The status of the user (active or inactive) is not taken into account. This means that even users who are currently inactive can be updated as long as their username is included in the CSV import file. They will then be reactivated and updated.
- Deleted users: Number of users who have been set to “inactive.” No permanent deletion takes place during CSV import. To permanently remove a user, they must first be set to “inactive” and then manually deleted from the LMS.
- Failed user imports: Number of rows from the CSV file that could not be imported because they contain errors or the username is missing.