Creating Tests
When creating a new test, you will see three tabs across the top: General, Settings, and System Messages.
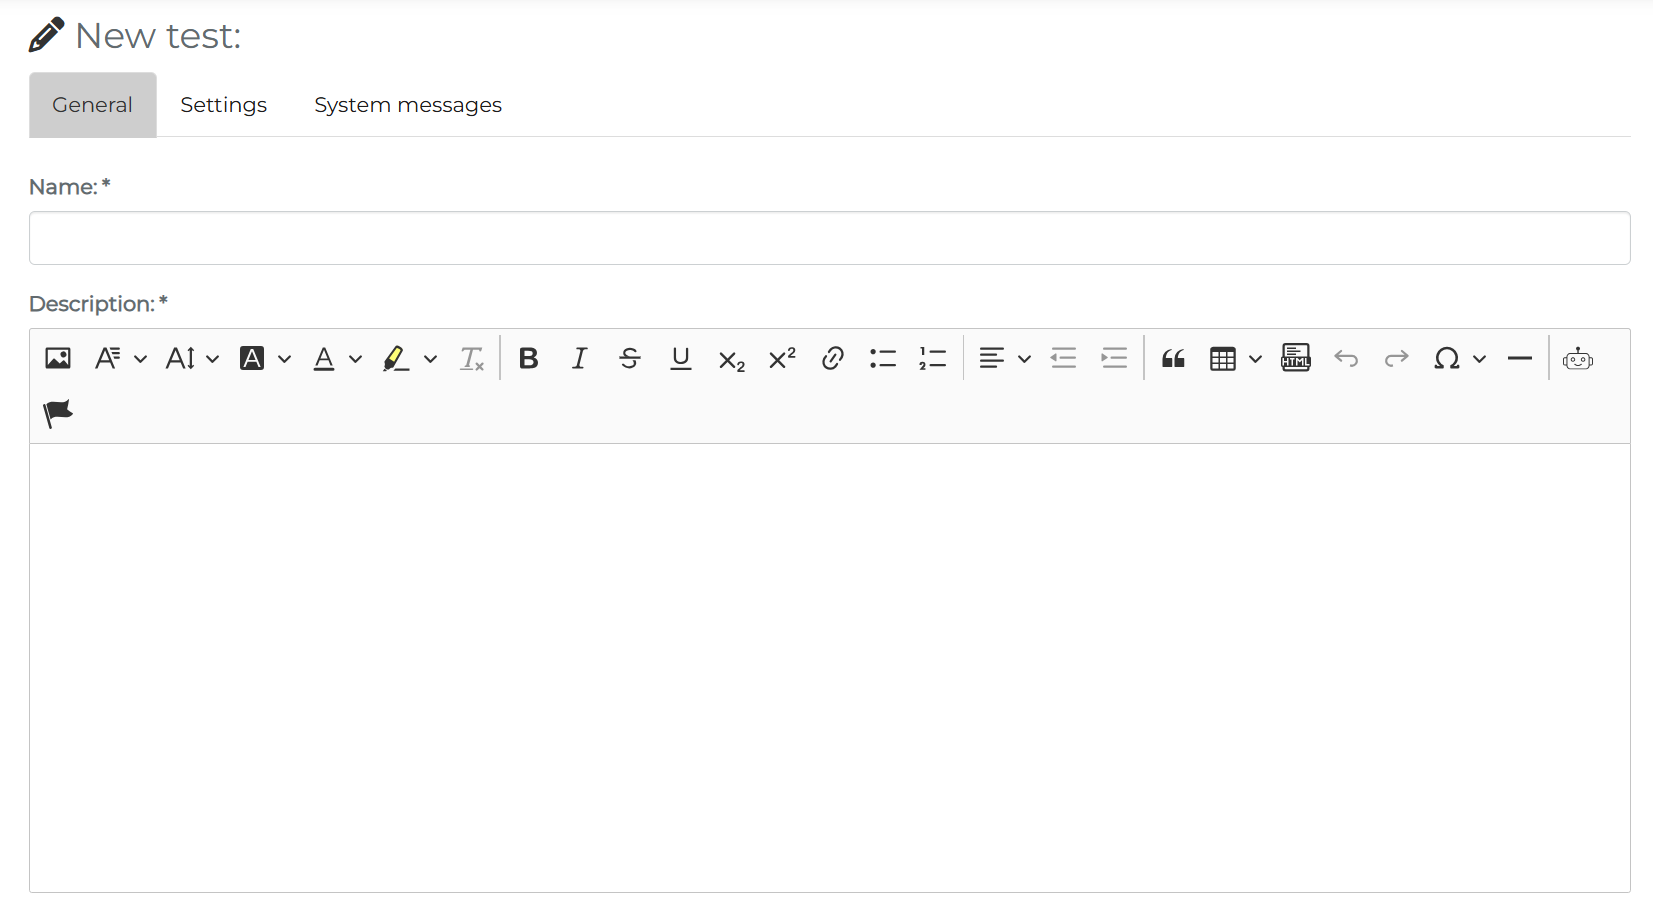
General
In this section, you will need to complete the most basic information about the test. Here, only the name and the description are required fields. For a detailed walkthrough of all the fields in the general tab, please see: Creating a Learning Unit: General Information
Settings
In this section, you can additional settings to tailor this test to your needs. All settings are given a detailed explanation on this page: Creating a Learning Unit: Settings
Tests have a few additional settings:
- Need to pass % – This setting determines the passing rate of the test.
- Hide Solutions – After submitting a test attempt, the correct answers will be hidden. Only the score of the test is displayed to learners.
- Hide Results – After sumbitting a test, users do not see their score. Only “Passed” or “Failed ” is displayed if a passing rate is activated.
- Time Limit – Determines the maximum amount of time a learner has to complete the test. A countdown timer is displayed in the upper-right corner of the test.
- Restricted Mode – Learners are unable to go back to questions they have already answered when this setting is activated.
- No Evaluation by Name – No identifying information is collected from the user when handing in the test. Note: These results will not appear in the Learning Status: Detail Statistics.
System Messages
This tab remains empty until the test has been saved for the first time. Then, the system messages that will be generated from the settings will be visible. Before saving, it is also possible to add a custom system message to this test. More about custom system messages can be found here: Creating a Learning Unit: Custom System Messages
Creating Questions
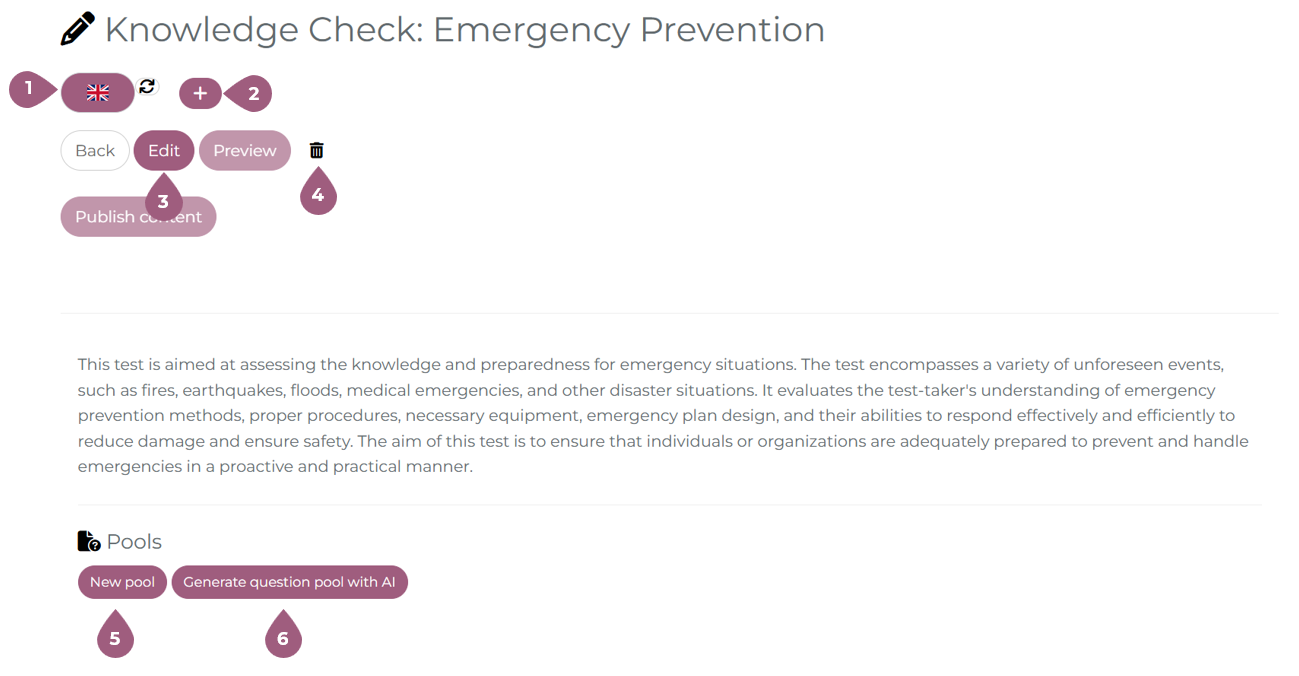
After clicking on save, you will land on the test overview page. Here it is possible to:
- Edit or change the language of the test
- Add languages to the test
- Edit the test properties
- Delete the test
- Create question pools
- Generate question pools (see AI: Generate Test Questions)
Creating Question Pools and Questions
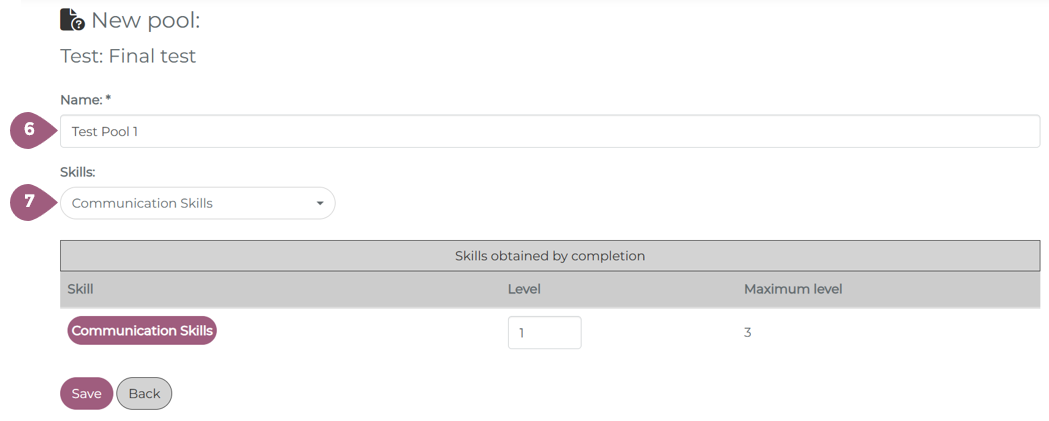
In order to assign a test to users or to include it in a curriculum or learning box, it must contain at least one question. Questions must be contained in a question pool (5). Pools are only visible to admins and are strictly for administrative purposes. When creating a question pool, a name must be entered (6). This name is not visible to learners. At this time, it is also possible to add a skill to the individual test pools (7). It is possible to add more than one skill to a question pool, or different skills to different question pools.
Note: Skills will be awarded when the user successfully passes the entire test, not just the individual question pool.
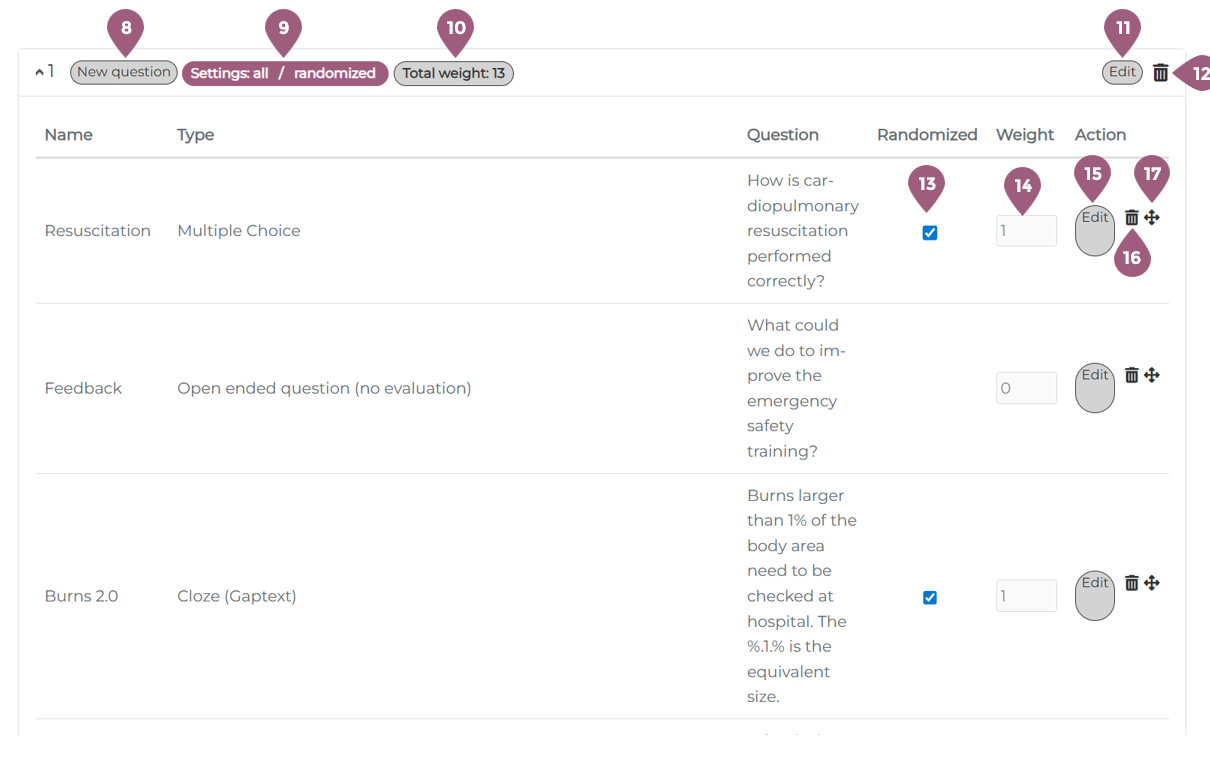
After naming the question pool, you will be returned to the overview. By clicking on “New question” (8), you can fill the question pool with questions. It is possible to create multiple question pools with different questions. More about question types is written below.You can manage the questions under “Settings” (9). In the settings, you can specify that learners are only shown a certain, randomly selected number of questions per question pool and that the questions are displayed in random order (randomization). If no questions are selected and there is only one question pool, it is not possible to assign the test to users.
The total weighting of the questions is displayed in the total weight (10). It is possible to change the weighting of the questions as long as the test is not in use (14). As soon as one user has completed the test, it is no longer possible to edit the total weight. Questions with no evaluation have a weight of 0.
If you want to change the name of the block, you can edit it (11). If you want to delete the entire block with the associated questions, click on the trash can icon (11).
Note: Deleting question pools cannot be undone! If users have already completed the test, their answers will not be shown in the statistics.
In the question pool table, it is possible to configure the individual questions. Their answers can be randomized (13), the weight edited (14), the wording updated (15), deleted (16), or reordered within the question pool (17). The order of the questions is completely customizable.
After a test has been published, there are changes you can make to a test. They are:
- Add new questions
- Delete questions
- Edit the wording of existing questions
- Reorder the questions
- Limit the number of questions shown to learners
- Edit “randomize” settings
Test statistics reflect exactly what is written in the question pool. Any and all changes made to the test in the question pool will be reflected in all tries completed by learners. The wording of questions, for example, will be updated in all tries in the statistics.
Note: Deleting questions or question pools from a test also deletes them from the statistics, including previously completed tries. Although the results themselves will not be corrupted, the answer view will be affected. Changing the number of questions (and thereby changing the weighting of the test) can also lead to corrupted records.
Types of Questions
When creating tests, there are eight types of questions to choose from, seven of which give learners points.
All questions require a name, a question, an correct answer (where applicable), a weight (where applicable), and the option to show the answers in a random order (where applicable).
They are as follows:
Single Choice
Single Choice always has exactly one correct answer from several possible answers.
• Enter the name and question in the input fields provided.
• Enter all possible answers: To create the input field for the next possible answer, use the button with the plus sign on the right-hand side of the bottom answer option.
• After entering all possible answers, mark the only correct answer using the corresponding checkbox. This checkbox is located below the input field for the answer option.
• To delete an answer option, use the button with the minus sign. This is located on the right-hand side of the corresponding line.
Multiple Choice
• Unlike single choice, multiple choice can have several correct answers, but this is not a requirement.
When creating a multiple choice question, please proceed in the same way as when creating a single choice question, with the only difference being that if there are several correct answers, you must mark them all as such (using the corresponding checkbox). This is located below each answer option.
• Multiple choice questions can also award partial points. With the setting “Award partial points for individual answer options,” the question is marked as “correct” and the corresponding point weighting is calculated, provided that at least one correct answer has been selected.
Open ended question (evaluation)
Free text questions do not have predefined answer options. The learner must enter the correct answer using the keyboard.
This question type is only suitable for questions with clearly defined answers that do not have alternative spellings.
The user’s input must match the correct solution exactly; otherwise, for example, in the case of a typo, the user’s answer will be marked as incorrect. This also applies to differences in upper and lower case letters and to answers that would be correct in terms of meaning.
• Enter the question in the input field provided.
• Enter the answer in the input field provided.
• Avoid typos in the answer, especially for this type of task, as otherwise correct answers will be considered incorrect.
Drag and Drop
In drag & drop tasks, pairs of two terms are formed. Each term on the left side must be matched with a term on the right side. To do this, learners must click on the elements displayed in random order on the left side and drag them to the correct field on the right side.
• Enter the instructions for the learner in the input field provided.
• Enter the first matching pair of terms in the two input fields displayed under the label “Answer.”
• To create new input fields for the next pair of terms, use the button with the plus sign on the right-hand side of the bottom row.
• To delete an answer option, use the button with the minus sign. This is located on the right-hand side of the corresponding row.
Sorting
This task type is a simpler version of drag & drop. Unlike drag & drop, learners only see a numbered list on the right-hand side when working on the task, rather than terms.
When working on the task, the stored terms are displayed to the user in random order, and they must use the mouse to put them in the correct order.
When creating this type of task, the correct order of the answers must be stored.
• Enter the question in the input field provided.
• Type each of the answers to be sorted individually and consecutively in the correct order into an input field.
• To create the input field for the next answer option, use the button with the plus sign on the right-hand side of the bottom line.
• To delete an answer, use the button with the minus sign. This is located on the right-hand side of each line.
Cloze (Gap text)
• Enter the question in the input field provided.
• Double-click with the mouse to select a single word that you want to replace with a drop-down list.
• Click on “Insert drop-down” to replace the selected text with a placeholder for the drop-down menu.
• The text module you selected should now have been replaced by a placeholder of the following type: %.1.% marks the first text module to be replaced by a selection list, %.2.% replaces the second text module to be replaced by a selection list, etc.
• Now select the entry “dropdown1” from the selection list below under the label “Select dropdown and add options” and enter all possible answers one after the other. To create the input field for the next possible answer, use the button with the plus sign on the right-hand side of the bottom answer option.
• After entering all possible answers, mark the correct answer using the radio button.
Open ended question (no evaluation)
In this type of task, the learner enters free text into the answer field using the keyboard. There is no scoring to determine whether an answer is correct or incorrect. The text answers can be viewed by the administrator using the statistics function.
Open question with optional document upload (individual evaluation)
With this question type, learners can type in a text and, depending on the settings, upload a document via an upload field, which is then evaluated by the person designated as the corrector. Any user in the LMS can be designated as a corrector. Different questions in a test can have different correctors assigned to them.
• Enter the question or work instruction in the input field provided.
• Select a corrector.
• Set whether document upload should be activated for learners in addition to text input and whether this should be mandatory.
The person registered as the corrector will then see an additional “Submissions” button next to the corresponding test in the learner area. It is also possible to evaluate submissions in messages or by email. This will take you to all comments and/or documents that have already been submitted, where you can evaluate them as ‘correct’ or “incorrect.”
Correctors are notified by email about submitted documents, and learners are notified as soon as their submitted document has been evaluated.